|
Unveiling the Craftsmanship of Skilled Plastering Contractors in Massachusetts
When it comes to transforming spaces, few elements are as essential as the quality of plastering. In Massachusetts, where historic charm meets modern aesthetics, choosing the right plastering contractor is paramount. In this blog post, we'll explore the significance of skilled plasterers in the Bay State, shedding light on the craftsmanship that elevates homes and businesses alike. Understanding the Importance of Quality Plastering Quality plastering serves as the foundation for a visually appealing and durable interior. For those in the Bay State, where architectural diversity is abundant, the expertise of plastering contractors becomes crucial. Whether restoring a historic property in Boston or crafting a new masterpiece in Worcester, the finesse of a skilled plasterer can make all the difference. The Role of Plastering Contractors in Preserving History Massachusetts boasts a rich tapestry of historical buildings, each with a unique story to tell. Plastering contractors play a vital role in preserving this history by employing specialized techniques for historic restorations. From horsehair plaster repair to meticulous skim-coating, these artisans ensure that the charm of the past seamlessly integrates with the demands of the present. Choosing the Right Plastering Contractor Selecting a reliable plastering contractor in Massachusetts involves considering a range of factors. Look for professional plasterers with expertise in new construction blueboard and plaster services, as well as those well-versed in repairing and restoring existing plaster. Additionally, seek contractors who understand the nuances of Massachusetts architecture and can adapt their skills to suit both historic and contemporary structures. The Enduring Legacy of Plastering Contractors in MA In the dynamic landscape of Massachusetts, where tradition meets innovation, the role of plastering contractors is indispensable. From preserving the historic charm of Boston's brownstones to crafting the interiors of new developments in Worcester, these skilled artisans contribute significantly to the aesthetic and structural integrity of the state's buildings. Choosing the right plastering contractor ensures that your project, whether a historical restoration or a modern addition, receives the attention to detail it deserves. Horsehair plaster is a type of building material which has been used for centuries to create durable, resilient walls and ceilings. It consists of a mixture of lime and sand, bound together with horsehair or wool for strength and flexibility. This type of plaster is no longer used today and unfortunately, over time horsehair plaster can become damaged, leaving homeowners needing to hire a professional plastering contractor to repair it.
If your home has horsehair plaster walls or ceilings in need of repair, give us a call or email us and we will stop by to take a close look at what needs to be done and provide a free quote. While DIY repairs may seem like a good idea, certain issues need a professional plasterer to ensure that your home's horsehair plaster is repaired safely, securely, and efficiently. Drywall repair sometimes can be a DIY type of project. There are holes that are so small the homeowner could take care of them him/herself if they desire to put the physical effort in.
If the drywall hole is small, you can buy a wire mesh patch sold in small sizes, which you can place over the hole. In addition, you will need mesh tape to apply at the seams between the wire mesh plaster patch and the existing wall or ceiling surface. If the drywall hole is large, you will need to obtain a piece of drywall 1/2" or 5/8's thick, depending on the thickness of your existing board, cut a square piece a little larger then the hole itself, place the drywall piece over the hole, mark around it with a pencil, and then cut out the squared hole. Next, cut two pieces of strapping larger than the hole and screw the pieces inside the hole with drywall screws so that you will be able to screw the new piece of drywall patch in place onto the strappings. The next step would be apply the mesh tape at the seams along with 2 coats of spackle/mud with a putty knife at a width of about 8-10 inches to blend in with the existing surface. Make it as smooth as you can, wait for it to dry and sand it before you apply a textured finish to match the existing finish or keep it smooth to have it ready to prime and paint. In summary:
Drywall repair can be extremely messy, especially when you need to sand. So, before you do anything, cover and protect the work area. If you don't want to deal with the mess, hire a professional plasterer to handle it for you. Contact Boston Plastering for assistance. Boston - MetroWest - Worcester - South Shore - North Shore "How to fix drywall" may be a popular search question because it seems like the repair is super simple. For a professional drywaller or plasterer, yes, it's very simple. But one of the things customers tend to forget about is the mess involved with any simple repair, especially plaster or drywall repair.
Drywall does not normally crack across the board itself, instead, it usually cracks along the seams or close to the seams between the each board. How simple it is to really repair drywall? It can become simple with practice. However, for starters, simply applying spackle (or "mud" as commonly called), does not do any good. One needs to locate where the strappings or studs are and screw the boards along the cracks and in an appropriate manner. Then, a mesh tape needs to be applied, we prefer the pink heavy duty mesh tape, which is not cheap, but helps prevent cracks even further. Then, apply 2-3 coats of mud properly, with an 8-10 inch drywall putty knife and at least 16 inches wide, to prevent bumps and to blend in with the surrounding surfaces. It needs to be as smooth as possible because you will need to wait for it to dry to then be able to sand it into a fully smooth finish. If the existing surrounding finish is textured, then you would apply a textured finish to match with the old finish on your wall or ceiling. In summary:
As a reminder, drywall repair can be very messy, especially when sanding. So, make sure you cover and protect the work area before doing anything else. If you don't want to deal with the mess, contact a professional plasterer to take care of the problem for you. Contact Boston Plastering to assist you. Boston - MetroWest - Worcester - South Shore - North Shore Why You Should Not Plaster Your Ceilings With a Textured Finish 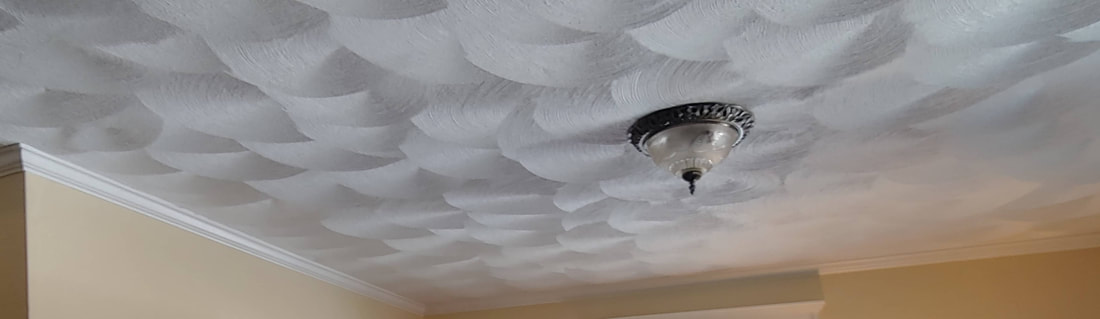 Everyone has their opinion on plastering finishes and a homeowner can certainly choose whatever finish he/she wishes to have on their home's ceilings (and walls).
Here is why you should refrain from plastering the ceilings (and walls) with any textured finish. 1- Outdated Look A textured ceiling may have been the thing to do in the past and in some cases recently. But as tastes and trends change over time, the textured look will look outdated and it will diminish the value of the home because a new buyer would look to have the ceiling changed to whatever is the common trend, which nowadays is a smooth finish. In addition, as trends become outdated, certain tools will no longer be available in the event of a needed plaster repair. 2- Damage Repair Difficulty Continuing from the point above, if you ever end up having water damage repair to your ceilings, if the ceilings are outdated and the type of tools used are no longer available, how would a new plasterer be able to appropriately repair it? It could be a nightmare to repair a textured water damaged ceiling (or walls for that matter). Patching a hole in such situation may be a lot harder to achieve than you may expect. It is always harder to find a plasterer to match a textured finish. Even if you do find someone to do it, it may not match exactly as each plasterer has their own way of plastering and own hand weight to apply the mud. If the professional plasterer is unable to patch the textured ceiling, the alternative would be to smooth out the entire ceiling, which will end up costing you more. 3- Home De-Valuation Your home will lose value on the long run. When you decide to sell your house, a textured finish will make the house have a lesser market value because the modern trend is to have smooth ceiling finishes (and smooth walls). 4- Residue Hold Up The grooves or elevated chucks formed with a textured finish (swirl, popcorn), will look gross with time. They can gather dust, grease, mold. Please, NEVER texture finish your kitchen ceiling! One of the top requests we receive is to smooth out kitchen ceilings in older homes. If you choose textured plaster finish, be prepared for some headaches as explained in the reasons mentioned above. Smooth finishes give a more modern look, smooth is the trend - it will add value to your property as many home buyers look for smooth finishes. We get tons of calls and requests to smooth out ceilings and walls. The process is more complicated to skim a ceiling or to skim coat a wall. An expensive plaster bonding agent would need to be applied. This process is more laborious and takes more time to complete. It is more difficult to skim coat over existing plaster than applying plaster over new blueboard. So, let the swirl plaster ceiling be gone! :) 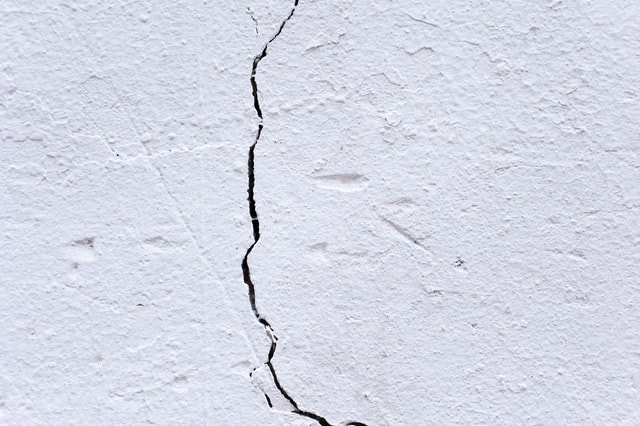 One would expect a new house to not have cracked walls or ceilings. However, a newly constructed house is prone to have cracks on walls and ceilings show up relatively early on. One of the reason why cracks show up is because with time, the house is settling in place. As the windy weather blows at the house, it makes the structure slightly move. Also, the cold and hot temperatures can cause the wood and other materials to dilate or contract.
The cracks are not necessarily a sign of structural damage. However, structural damage is one of the major causes for ceiling cracks. If there are foundation problems, ceiling cracks may appear because of foundation settlement which puts stress on the building’s frame. Thin, spider web cracks in the plaster or painting are usually nothing to worry about. However, to be on the safe side, if you suspect the cracks may have a deeper issue than just a cosmetic one, you should contact an experienced foundation repair professional to take a look at the cracks on your walls and ceilings. Then, when you are ready, reach out to us to go in to take a look and price out for the plaster repair. Cracks can eventually come back at the same spot or at different spots. Reasons for wall and ceilings cracks include (and are not limited to): the house aging, the foundation settling, construction being done nearby with heavy machinery, heavy trucks constantly driving by and causing vibration to the house, heavy wind loads hitting against the house slightly moving it… So many things can happen to cause cracks. When this occurs and you are ready and in need of a good plasterer to fix the cracks and do touch-ups in your Massachusetts house, or any other interior plaster service, give Boston Plastering a call! 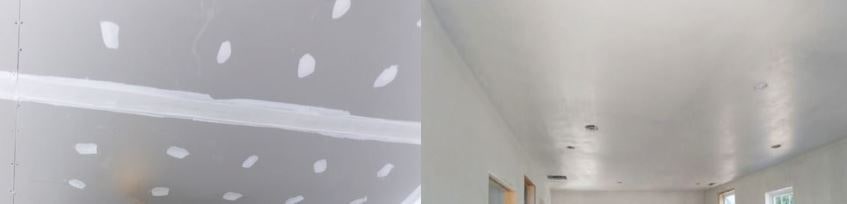 Are you renovating your home or building from scratch? Are you planning a home addition or building a garage? Are you structuring a commercial building? What should you use for the walls and/or ceilings? Should you go with drywall, tape and mud or blueboard and plaster in your new construction or home renovation?
When deciding to use drywall or plaster on a project, there are various aspects to consider. Having knowledge on the subject is important and comes in very handy in understanding the difference between the two methods. Each of them require different skills, so be informed before making a decision. Factors such as budget, timeframe, property type, and preferred outcome will affect your decision when making up your mind between drywall and plaster. Drywall Hanging, Tape, and Mud Drywall systems have become more popular over recent years since it tends to be quicker to install. Therefore, it is widely used in the construction of new building developments. Drywall involves fixing large pieces of plasterboard to wooden studs to create a smooth and seamless look. After the drywall sheets are hung or installed, drywall tape & mud is applied at the seams and over the screws. After this last step, the mud/joint compound will need to be dry in order for the seams to be sanded (expect lots of white dust!!). Then, the drywaller’s job is finished and the client will be ready to paint over the whole thing. Blueboard and Plaster / Plastering Plastering has been used for a really, really long time. It is often a favorite choice in older homes since it has demonstrated to provide a stronger and long-lasting surface. Many homeowners desire the finished look that plaster brings, but it can be a more expensive choice due to its more labor-extensive process. Keep in mind that anything to do with plaster gets places very dirty because of all the white plaster powder particles flying in the air. Therefore, there is a considerable amount of time to prep the work area. A small patch repair job may seem simple and take a short amount of time for the work itself, however, there is a lot of protection and cleaning up involved, not to mention walking back-and-forth to the truck and the work area until the plasterer is ready to start. Once starting the project, the hard-working guys barely have time to pause because once the plaster mix starts drying, the surface becomes hard like a rock. So, the work must be fast-paced to get that nice smooth finish so desired by homeowners. There is just so much that can be done in one day when one physically works so hard and without stopping. To fit in more plaster mixes in a day, means so many hours to get it done, depending on the size of the team needed or available for that project. Plasterers apply plaster mix onto gypsum boards, also called blueboard or sheetrock, depending on the purpose needed... (Click on Read More to continue) Uni-Kal: Dries faster, hard to work with, a hard surface plaster. Has to be mixed with water. Better if used for small projects/repairs.
Diamond: Takes longer to dry, softer plaster, easier to work with, needs to be mixed with water. Quality of Uni-Kal vs Diamond product is about the same. X-KALibur: Falls between Uni-Kal and Diamond. The surface is harder than Diamond but softer than Uni-Kal. Also mixes with water. Joint Compound: Prepared plaster mix. It already has the appropriate consistency to apply without having to mix anything to it. You will need to wait longer for it to dry though, anywhere between 1-3 days to be on the safe side, especially if you will be painting over where you repaired. Joint compound is ideal for small cracks and holes – much less messy, although you may need to lightly sand your finish in a couple of days (which will then cause some white dust), so beware. Easy Sand 90, 45, 20: Used like joint compound but needs to be mixed with water. The number shown indicates the amount of time (in minutes) for the mixed paste to dry. Note: You can use an Accelerator to make the plaster dry faster and you can use a Retarder for the opposite route - to slow down the drying of the plaster to give you more time to work with it before it dries like a rock! By Fernanda C. The first step is the full demolition of the walls and ceilings or cutting out the damaged plaster with an appropriate sharp knife. Make sure not to just cut out the exact area of the damaged plaster but give an extra 2 inches around it and in a squared shape as much as possible so that it is easier to hang the new blueboard. If insulation against the cold/hot weather is desired, the insulation is placed inside the walls at this point. This can also help to muffle sounds, but will not make the room sound proof. Plaster walls and ceilings can get destroyed as a courtesy of a hurried plumber or electrician who does not care since they are not the ones patching the holes. Warning: Cutting through plaster is a messy job with the white dust and possible crumbling pieces. In a clean bucket with cool tap water, you will mix the plaster product, to the consistency of natural peanut butter. The plastering powder or mix to use will depend on the amount of time you need to get the finish done. You can get a basic idea reading this short list on the different types of plaster mixes. Plastering work is certainly not an easy task but the end result is worth the effort and money invested. This is not a trade for an ordinary homeowner without experience who is trying to save money thus doing a DIY job. DIY in this case, we do not recommend. Fighting against time to get the correct texture on your walls or ceilings before the plaster dries is almost calamity, unless you are sure of what you are doing. Otherwise, you will end up having to call an expert to get it done right for you when you could have saved a lot of time and aggravation if you had called them to begin with.
Something to note: If you are looking for a more high-end finish, opt to have walls and ceiling done with a smooth finish. This finish is more desirable for aesthetic reasons and may make your house worth more. It also may cost a little more, but looks much better. It takes a true artisan with eyes for details to get your walls and ceilings finished in the appropriate manner. By Fernanda C. To make a room sound proof, there are many steps to be accomplished. Besides having sound-proof, or close to sound-proof windows and doors, there are specific products that can be used to sound proof a room. After the framing is set up, either wood framing or steel framing, sound proof insulation is one product that can be used and it can reduce noise by approximately 70%. This certainly helps with noise reduction and would be the cheapest way to go about it. Besides reducing noise, let’s not forget that the insulation will help keep the room warmer in cold weather saving you money with heating and less hot in the Summer months saving you money in energy by not having your AC working so hard.
In addition, to make a room more sound-proof, there are sound proof boards that can be used/installed to make the room quieter. Also called Absorbing Acoustic Panels, they are much more costly than just regular blueboard/drywall. However, sure worth it depending on what you are trying to achieve. QuietRock Sheetrock is a specialized product for sound proofing, which is known to reduce noise by about 80%, however, if the noise you are trying to block is impact noise (people walking for example), resilient channel and acoustic clip in addition to the QuietRock should be used. The material can be very costly. The work is certainly more laborious and heavy. By Fernanda C. |
|
Hours of Operation
Mon - Fri: 7:30am - 5:00pm Sat: 9:00am - 2:00pm |
Follow us |